
[Update (April 2019): deck has been slightly adjusted based on feedback we’ve received from people playing the decks]
Everyone loves the Empire Strikes Back. But when trying to explain to others why it’s the best Star Wars movie you inevitably sound like you love soap operas. Luke learns who his father is, but he doesn’t know who his sister is, and the man his sister loves is frozen in carbonite. Basically every Telemundo story line.
My favorite Star Wars scene, and potentially favorite scene from any movie, is the opening battle on Hoth. Replaying this battle via SWCCG is basically a dream come true and highlights both the incredible gameplay of SWCCG and the drama of Empire’s introductory sequence.
Hoth is a planet where I would like to live. I love the winter – on Hoth no one questions why you’ve been playing SWCCG for six hours straight on a Tuesday. You’re playing because if you go outside you’ll die of frostbite and exhaustion. What an amazing life.
As a quick recap, the Imperials find the secret Hoth base, AT-AT walkers arrive (what a vehicle!), an epic battle ensures with the full might of the Imperial navy trying to eradicate a secret rebel base, and the rebels are lucky to escape at all. This battle is a true representation of the rebellion – outgunned, outmanned, under supplied, relying on courage and ingenuity to persevere. [Don’t get me started on any recent films where the Dark Side appears to be the underdog and sustains incredible amounts of damage from lone star fighters or untrained peasants]
“Target the Main Generator” – a terrifying order from a supremely confident General preparing to complete his mission. As he should, given his supreme firepower, Veers succeeds in destroying the generators. The rebel cause is lost, aside from the hasty escape of a few Medium Transport vessels.
At SWCCGStore.com We’ve put together a deck to specifically recreate this battle. The primary difference between the deck and the movie is that the rebels have no Medium Transports. There is no escape, which only adds drama to the battle!
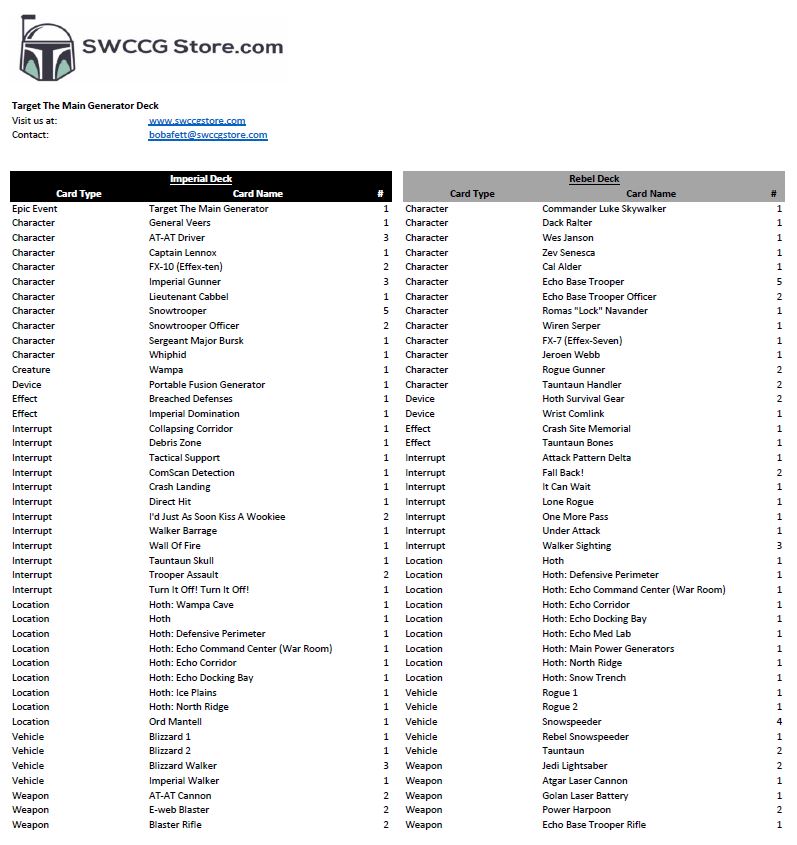
Here is the decklist in PDF form: Target The Main Generator Hoth Deck List (April 2019)
The deck can be purchased here: Hoth “Target The Main Generator” Deck
And an image:
Unlike the “Attack Run / Commence Primary Ignition” deck, the rebels don’t have an Epic Event to pursue. The Imperials bring the battle to the Rebels, and the Rebel strategy is to survive. I’d recommend playing both sides with your opponent, and if both people lose as the Rebels the true winner is the person who lost the least amount of life force.
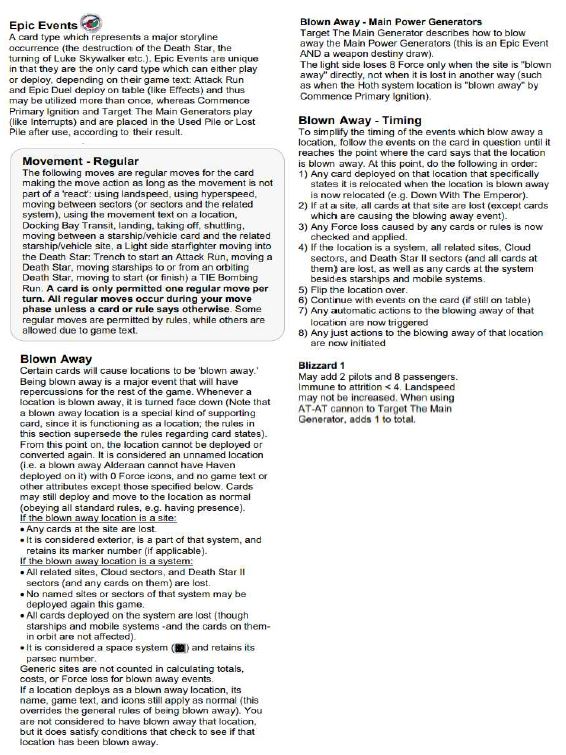
Make sure to review the “Blown Away” rules. Specifically, the Light Side loses 8 force if the Imperials succeeds in destroying the Main Generators.
Blown Away Rules (PDF): Blown Away Rules – Hoth
Given the significant impact of losing 8 life force, the Rebel strategy should be to attempt to engage the Imperials, knock out as many AT-ATs as possible (specifically Blizzard 1), and just limit battle damage sustained. With 6 AT-AT Walkers in the deck the Imperials will keep coming, but the Rebels have a bit of an advantage with Commander Luke. He’s the most powerful character in both decks and can be used to wreak havoc on the AT-ATs. Luke with a Lightsaber can use Under Attack to target AT-ATs during the Control phase. In addition, Luke in Rogue 1 with a power harpoon (as well as Lucky Shot) is generally good for an AT-AT per battle as well.
On the Imperial side, focusing on Target the Main Generators is the most fun way to go. Veers in Blizzard 1 is the obvious choice for taking the shot. The tricky part about the deck is that the Imperials will also want to control a couple Hoth sites to add to the destiny. This creates a problem of spreading out the AT-ATs at risk of Luke eliminating Blizzard 1 or picking off AT-ATs one at a time (particularly with Under Attack as losing an AT-AT in the Control phase can then lead to an ugly battle). A plethora of Snowtroopers helps to control different sites though, and the sheer number of AT-ATs and Snowtroopers can also be enough to overwhelm the Rebels even if “Target” isn’t successful. Oh, and don’t forget to unlease your Wampa if the Rebels start force draining at the outer perimeter.
We’re early on in testing this deck so let us know if you have any suggestions or different strategies!
